
A custom connector lets Claude work with a tool that isn't in its built-in directory: your company's software, an internal database or a niche app your team runs on. You add one by pasting a single link into Claude's settings. It takes about five minutes, and you don't need to write any code.
This guide walks through every screen on claude.ai and the Claude desktop app. We'll use Dovito's own connector as the example, so you can follow along click for click and then swap in the link for whatever you're connecting.
What is a custom connector in Claude?
Connectors give Claude access to apps and data outside the chat, so it can look things up and take actions for you. Claude ships with a directory of ready-made connectors (Google Drive, Gmail, Slack, Notion and thousands more). A custom connector is one you add yourself by pointing Claude at a remote MCP server.
MCP stands for Model Context Protocol, an open standard for connecting AI assistants to other software. A remote MCP server is simply a web address, usually ending in /mcp, that the software company runs. When you add it, Claude learns what that tool can do and uses it when it helps answer you.
What you need before you start
- A Claude account. Custom connectors work on every plan. Free accounts can add one; paid plans can add more.
- The connector's URL. The company that makes the tool gives you this. It always starts with
https://. - Your login for that tool, if it asks you to sign in.
We'll add Dovito's connector, which lets Claude read your Dovito process maps, projects and documents:
https://mcp.dovito.com/mcp/systematicsOpen Customize in Claude
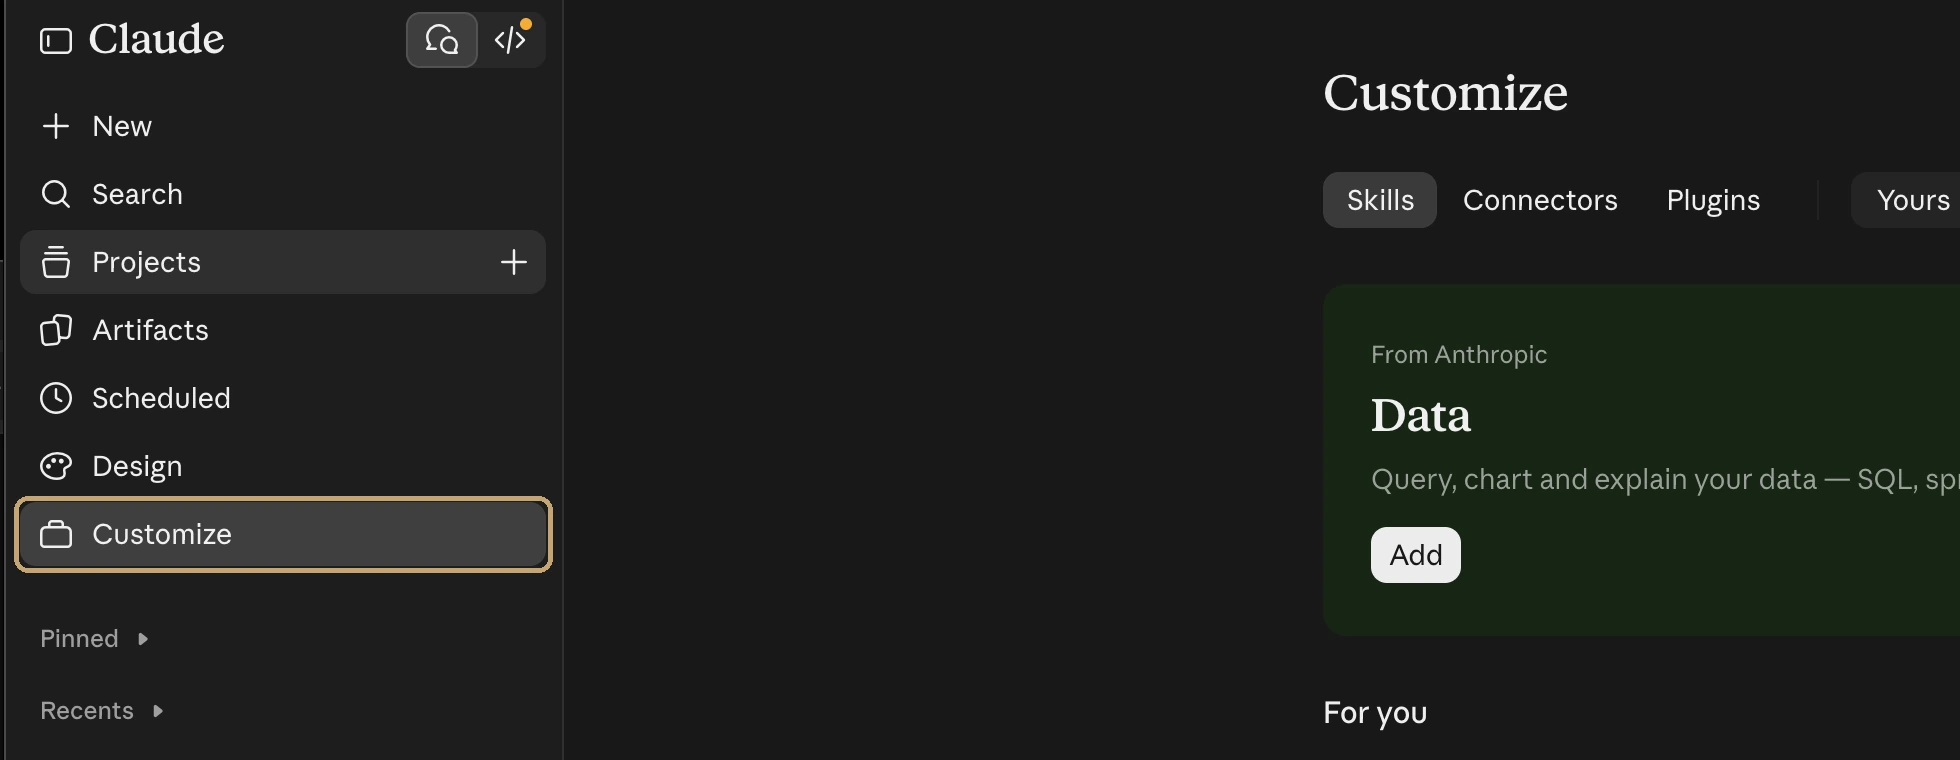
In Claude, click Customize in the left sidebar. If the sidebar is hidden, click the panel icon in the top-left corner to open it. The steps are the same on claude.ai and in the desktop app.
Choose Add custom connector
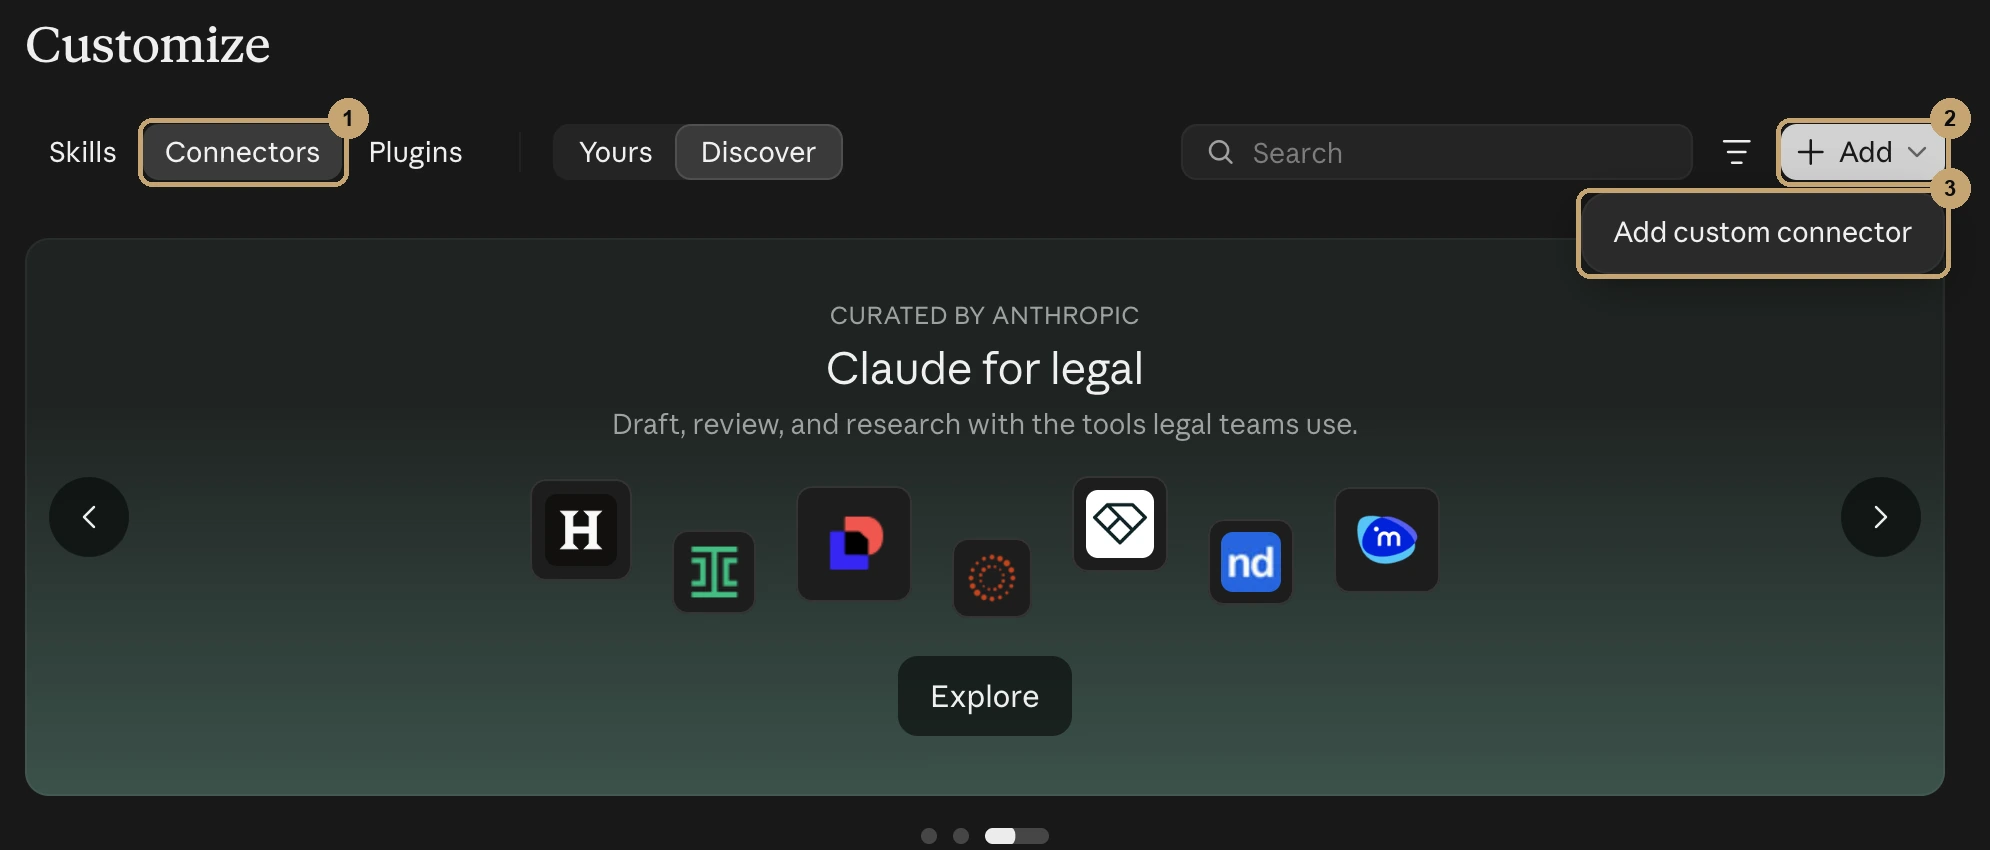
Click the Connectors tab at the top of the page. Then click + Add on the right and choose Add custom connector.
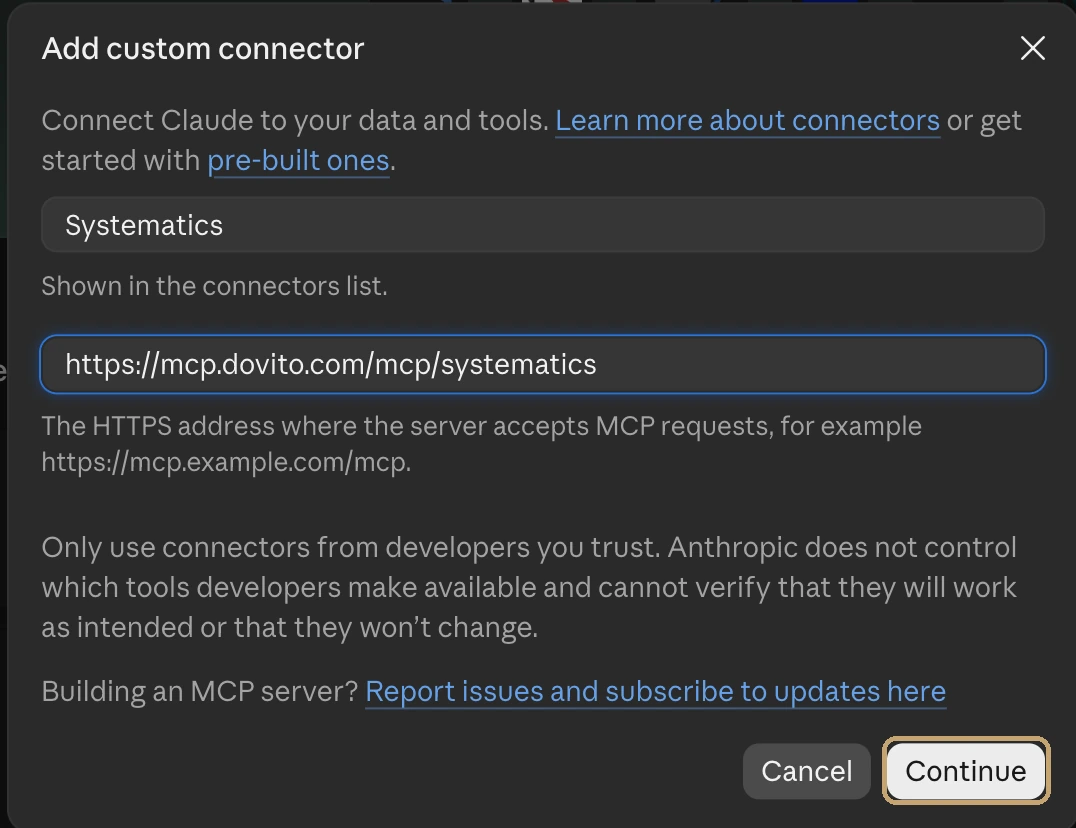
Name the connector and paste the URL
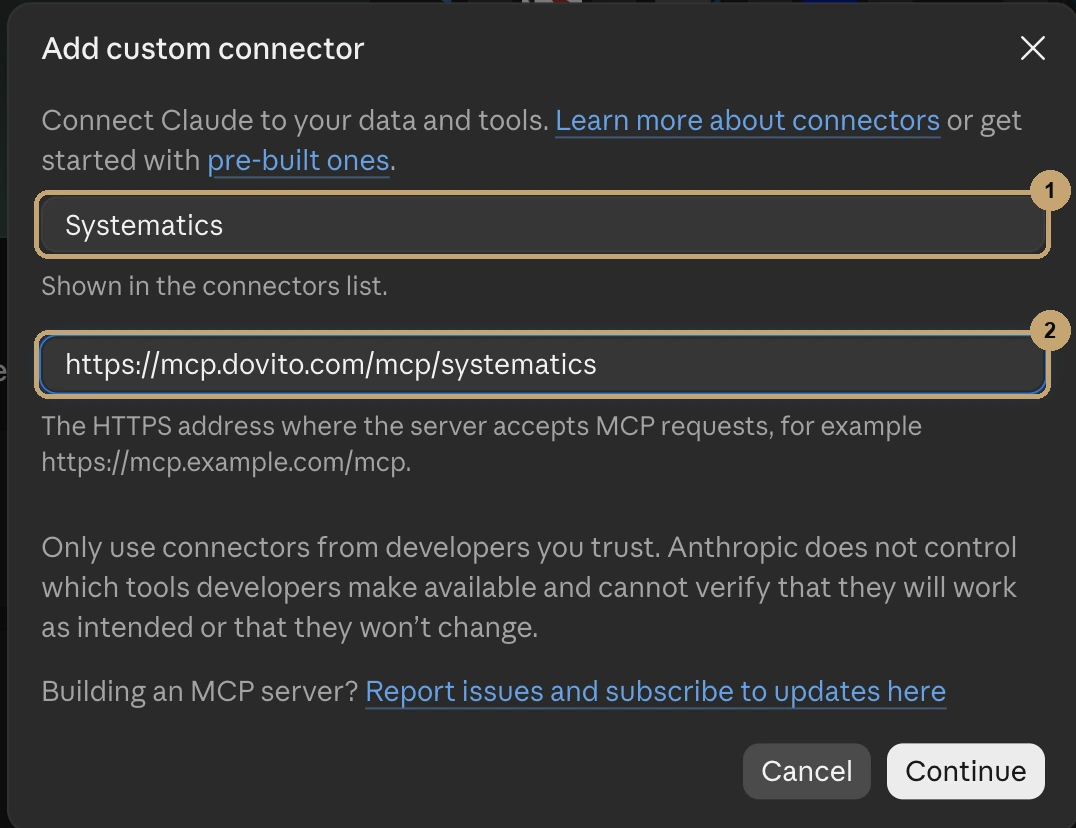
Type a name in the first box. It's only a label for your connectors list, so pick something you'll recognize, like Systematics. Paste the connector's URL into the second box, MCP server URL.
Click Continue
Claude checks the server, which takes a few seconds. If the URL is wrong or the server can't be reached, you'll see a message here instead of the next screen.
Click Connect and sign in
Claude adds the connector and opens its page. Click Connect. If the tool asks you to sign in, a window opens where you log in and approve access.
Once you're in, Claude says it's connected and lists the tools the connector offers. You can set whether Claude asks before it uses each one.

Use the connector in a chat
Start a new chat and ask something only that tool can answer. With our example, try "Do I have any open tasks today in my Dovito account?" If Claude asks permission to use the connector, allow it.

Adding a custom connector for your whole team
On Claude Team and Enterprise plans, an Owner adds the connector once for everyone. Go to Organization settings, then Connectors, click Add, hover over Custom and choose Web. The rest matches steps 3 to 5 above. On Enterprise, people with a custom role that can manage libraries can add connectors too.
Each team member then opens Customize, then Connectors, finds the connector (it's usually labeled Custom) and clicks Connect to sign in with their own account.
Troubleshooting
| What you see | What to do |
|---|---|
| "A connector with this URL already exists in your organization" | Someone already added it. Find it in Customize, then Connectors, and click Connect instead of adding it again. |
| You can't add a second custom connector | Free plans allow one. Remove the one you have or upgrade your Claude plan. |
| Claude can't reach the server | Check the URL for typos. The server has to be reachable on the public internet; if it sits behind a VPN or firewall, your IT team needs to allow Anthropic's IP ranges. |
| The connector doesn't show up in a chat | Start a new chat after adding it, and make sure you finished signing in during step 5. |
Is it safe to add a custom connector?
Claude reminds you of this on the setup screen, and it's worth taking seriously: only add connectors from companies you trust. Anthropic doesn't control which tools a custom connector offers and can't verify how they behave, so treat the URL like any app you'd give access to your data. Use links that come straight from the company's own website or support team.
Frequently asked questions
Do custom connectors work in the Claude desktop app?
Yes. A remote connector is saved to your Claude account, so once you add it on claude.ai it's also available in the desktop app.
What's the difference between a custom connector and a local MCP server?
A custom connector points to a server on the internet and is set up in Claude's settings, with no files to edit. A local MCP server runs on your own computer, is configured in the desktop app's claude_desktop_config.json file, and only works in the desktop app.
How many custom connectors can I add?
One on the Free plan. Paid plans can add more.
Where do I find a connector's URL?
From the company that makes the tool, usually in their help docs or integrations page. Dovito customers can use https://mcp.dovito.com/mcp/systematics.